Family Traditions
>> June 23, 2012
So I sat down and wrote 99% of this post and saved it in draft format. Only to find out later that for some reason my "draft" didn't save and I was left with only the title. Enter sad pouty-face Carolyn. Sadly I don't remember what I said in my post. Like at all. I'm sure it was cleverly composed and teeming with wit, but alas...we'll never know.
Anywho...I'm not going to try to recount what was written previously, but to simply state the main theme of this post which is as you might have guessed...Family Traditions.

I love traditions. Traditions are just memories that you have the opportunity to recreate, relive, and revive with new people in a different time. I love sharing experiences with other people and especially with my family.
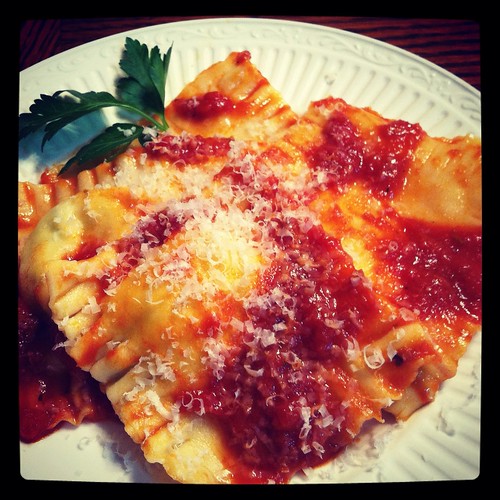
My Dad and I made this ravioli one weekend while I was visiting home and it was such a cool experience. Although pasta making isn't traditionally something that I've done with my family, it has been a large part of my family. While my dad and I were cranking out sheets of fresh pasta dough, he was telling me stories of my 'Big Nonni' (my great-grandmother) and the pasta that she used to make for him. He remembered her kitchen counter being covered with all kinds of fresh pasta that she would roll out by hand. And he told me about the special way that she used to twist her thumb into a ball of pasta dough to make orecchiette (or-kee-yet-tee) and cavatelli's (cah-vah-teel's).
That's the good stuff...that's why I love traditions. It's getting to hear stories about my family's past and in a way, traveling back in time and getting to know my great-grandmother a little better. It's stories like these that remind me of where I came from, and let's me know that deep down inside I have a little of her in me.
I like to think that Big Nonni would have been proud of our ravioli adventure and this is definitely something that we'll be working into our future family traditions!
Fresh Pasta
Adapted from: Smitten Kitchen
3 Cups All-Purpose Flour
4 Large Eggs
1 teaspoon Kosher Salt
4 Tablespoons Water
*Requires Food Processor
Combine all ingredients in the bowl of the fo-pro (food processor) and blend until the dough just begins to form a ball (add water drop-by-drop if the dough is too dry). Process the dough for another 15 seconds more and transfer to a floured surface and let stand, covered with an inverted bowl for 1 hour.
Filling
16 oz Ricotta Cheese (full fat)
2 Cups Parmigiano Reggiano*, freshly grated
1/4 Cup Fresh Basil leaves, chopped
2 Tablespoons Italian Flat Leaf Parsley, chopped
1 Large Egg
Salt
Combine all the ingredients together and set aside
*It is SO important that you use the real stuff here...please make sure it's Parmigiano Reggiano and not domestic parm. you'll thank me later :)
Sauce
1 28 oz can Crushed Tomatoes
4 Cloves Garlic, chopped
3 Tablespoons Tomato Paste
1/4 Cup Red Wine
Heat Olive Oil over medium heat until shimmery, then add the chopped garlic and cook until brown (be careful not to overcook). Add the tomato paste (the mixture will sputter) and stir to combine with the garlic. De-glaze the pan with the red wine and simmer until the the liquid has almost completely evaporated.
Add the can of Crushed Tomatoes and let simmer over low heat for at least 30 minutes, but preferably and hour. Salt & Pepper to taste.
Assembly
Use a pasta roller to roll the sheets of pasta dough into uniformly thin long sheets.
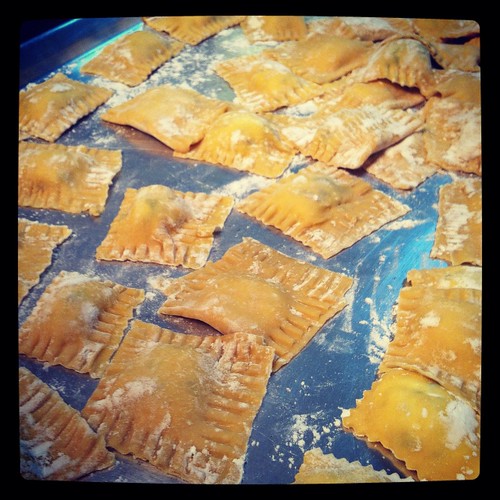
Once the pasta sheets are finished, lay half of them out on a work surface and drop tablespoon size dollops of the cheese mixture onto the pasta sheets about two inches apart from each other. Place the other half of your pasta sheets on top of the cheese mixture and press down to eliminate as many air bubbles as possible. Cut the pasta sheets into individual ravioli's with a pizza cutter or a sharp knife. Crimp the edges of the pasta with a fork to prevent the cheese from seeping out while cooking.
Cook the ravioli's in salted boiling water for a few minutes (fresh pasta cooks much faster than dried) until the dough is al dente.
Pluck the ravioli's out of the water with a slotted spoon and cover with sauce so that they don't stick to each other.
Read more...